

Finishing Drills
Mican series:
1 foot
2 feet
Reverse
2-ball
Elbow Finishing:


Offensive player (1) starts at the elbow, and completes a dribble combo before driving (2 dribbles max) and working on the prescribed finish.
You can add a defender (X1) to contest the finish.
Potential Finishes to Work On:
Regular Layup
Off Two Finish
Floater
Jump Stop + Step Through
Pro Hop
Stride Stop + Reverse Pivot (“Rondo”)
Stride Stop + Reverse Pivot + Step Through
Off Foot Finish
Inside Hand Finish
Euro Inside
Euro Outside
Fresno 1 on 1:


Defender (X1) starts on the three point line and cannot move until the ball handler (1) reaches the cones.
This delay creates a small advantage for the offensive player to get downhill and finish.
Once one side has gone, the other side goes right after and you continue alternating sides.
1 on 1 Finishing Against Help:


Offensive player (1) starts at the 45 while the defense is positioned on the weak side halfway between the three point line and the block.
The offensive player starts with a prescribed dribble combo before attacking the rim to finish.
The defender (4) can move on 1’s drive with the goal being to get their chest in front of the ball and go straight up (this is a great drill to work on contesting shots at the rim as well).
1 on 1 Transition Finishing:


Cones are placed at both elbows and an additional cone at the top of the key (half way between half court and the three point line).
The defender (facing the hoop) starts ahead of the offensive player (with the ball).
The defender (X1) is going to pick a direction, left or right, and begin sprinting to and around the cone at the elbow. The offensive player (1) can go on X1’s first move and must go to and around the cone at the opposite elbow before looking to attack the rim.
1 attacks downhill looking to finish while X1 attempts to contest. This is a great drill to simulate transition finishing while getting more time on task without the need to go full court each rep.
1 on 1.5 Finishing:
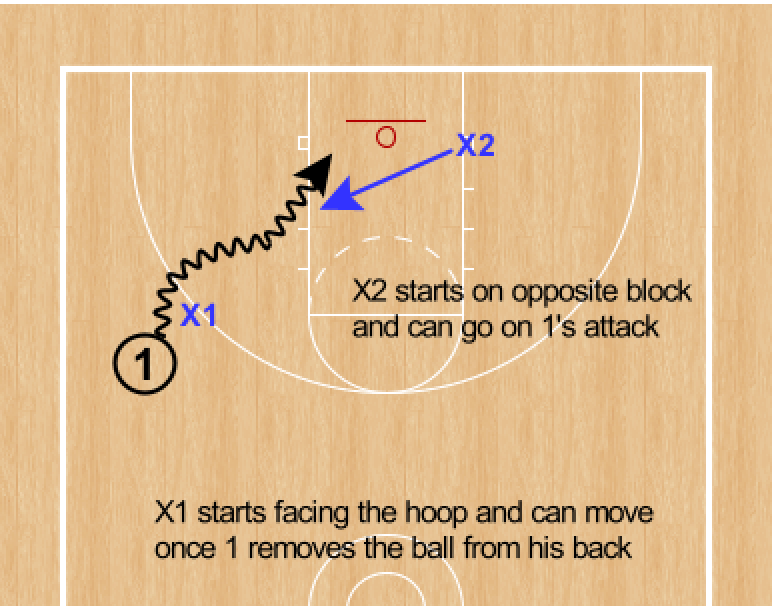

X1 starts facing the hoop and X2 starts on the opposite block with 1 positioned at the 45.
1 can attack either direction. X2 can move on 1’s first move and attempts to get their chest in front of the ball and go straight up to contest the finish at the rim.
X1 can also move on 1’s first movement and attempts to recover and contest as well.
This is a great drill to simulate finishing against the help defenders at the rim once you’ve gotten a step on your man.
Be sure to rep it from both sides, and you can even prescribe finishes if there is a certain move or two you are wanting to drill.
Rip 1 on 1:


X1 and 1 start by facing each other (butt to the sidelines) and both are holding onto the basketball. The drill goes live once 1 rips the ball to begin his attack.
1 attempts to get downhill and finish while X1 attempts to recover and contest 1’s finish.
Be sure to rep it from both sides, and you can even prescribe finishes if there is a certain move or two you are wanting to drill.
Blind 1 on 1:


The defender (X1) starts on the elbow facing the baseline with the offensive player (1) holding the ball out against X1’s back.
The drill is live when 1 pulls the ball off X1’s back and begins to attack (either direction).
1 attempts to get downhill and finish while X1 attempts to recover and contest 1’s finish.
Be sure to rep it from both sides, and you can even prescribe finishes if there is a certain move or two you are wanting to drill.
Circle 1 on 1:
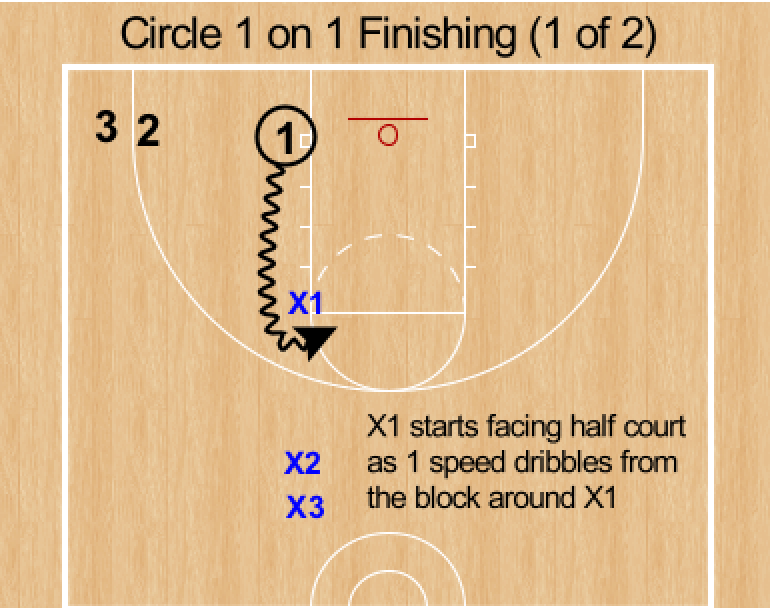

The defender (X1) starts at the elbow facing half court, while the offensive player (1) starts on the strong side block with a ball.
1 begins by dribbling around the defender - once 1 crosses X1’s face, the drill is live.
1 attempts to get downhill and finish while X1 attempts to recover and contest 1’s finish.
Be sure to rep it from both sides, and you can even prescribe finishes if there is a certain move or two you are wanting to drill.
DHO 1 on 1:


The defender (X1) starts on the low wing with a ball, while the offensive player (2) starts on the opposite low wing.
A cone is positioned at the three point arc at the top of the key.
X1 dribbles to initiate a DHO with 2 above the cone.
Once 2 receives the handoff, he looks to attack downhill (going around the cone). While X1 (player who handed the ball off) goes around the cone and attempts to recover and contest 2’s finish.
Be sure to rep it from both sides, and you can even prescribe finishes if there is a certain move or two you are wanting to drill.
Full Court Alley 1 on 1:


X1 guards 1 as they play full court 1 on 1, but the offensive player must stay between the lane lines.
The offensive player (1) is looking to beat X1 and attack in a straight line all the way to the rim.
If X1 gets beat, he needs to sprint and catch up to cut off 1 and force him to change direction.
Once you and your partner reach the other side, wait for the remaining players before alternating roles on the way back.
Around the World 1 on 1:


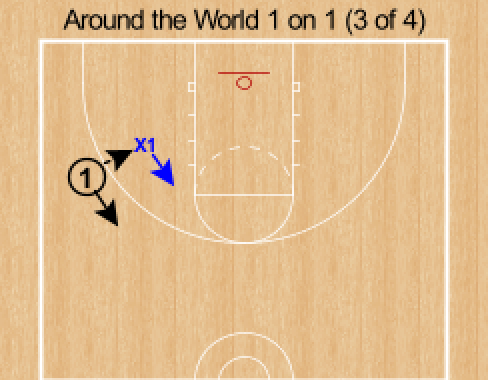

The offensive player (1) starts with the ball in the corner being guarded by the defender (X1).
1 and X1 begin tossing the ball back and forth as they make their way around the perimeter.
1 can attack off the catch at any point along the perimeter, at which point the drill is live.
Pound 1 on 1:


The offensive player (1) starts with the defender (X1) on his hip while pounding the ball with his outside hand in a stationary position.
At any point, 1 can begin attacking, at which point the drill is live and X1 attempts to recover and contest 1’s finish at the rim.
You can do this drill from any spot along the perimeter.
2-Man Game 1 on 1:

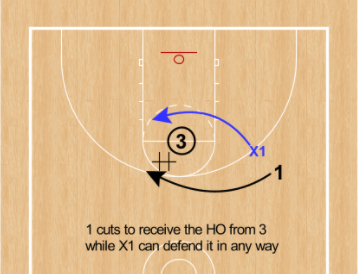

The offensive player (1) starts with the ball on the wing being guarded by the defender (X1). There is also a player or coach positioned in the center of the free throw line.
1 passes the ball to 3 and sprints to receive the handoff, with their first option being to get downhill.
If 1 cannot get downhill from the hand off, 3 can turn and set a ball screen for 1 to attack. After the hand off and ball screen, 1 can no longer use 3 for help.
You can prescribe defensive coverages depending on what you are wanting to work on (i.e. X1 go under the hand off, but over the ball screen, etc.)
Contested Shooting & Finishing:
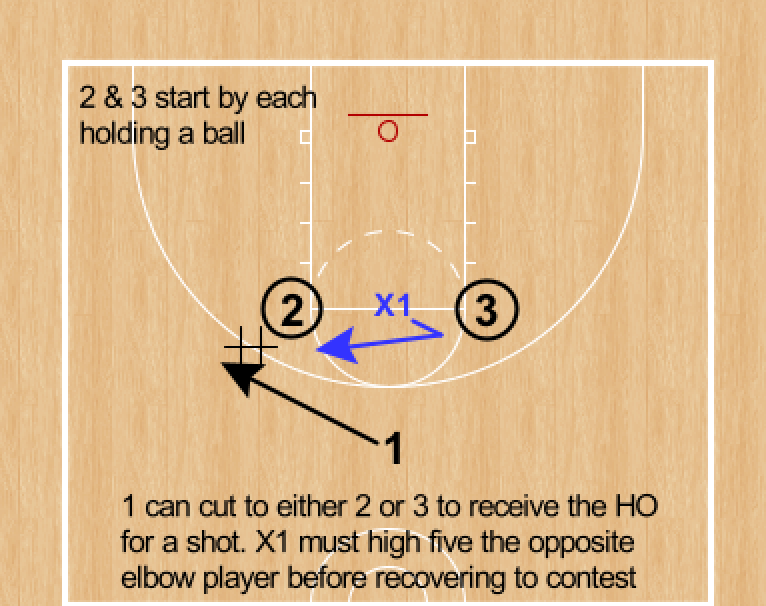


Two players start on the elbows (2 & 3), both holding a ball with their outside hand. The defender X1 starts on the FT line in the center of these two players). The offensive player (1) is at the top of the key.
The drill starts when 1 cuts either direction to receive the handoff for a shot from the player at the elbow.
On 1’s cut, X1 must high five the player at the opposite elbow before closing out and contesting 1’s shot.
After shooting the ball, 1 sprints to receive the DHO from the player at the opposite elbow while X1 attempts to defend it.
1 looks to turn the corner and get downhill, while X1 attempts to recover and contest.
You can prescribe defensive coverages depending on what you are wanting to work on (i.e. X1 go over the hand off, etc.)
Closeout 1 on 1:


The offensive player (1) starts in the corner, with the defender (X1) starting on the strong side block. The coach has the ball at the top of the key.
The drill starts when 1 blast cuts or cuts from the corner to the wing to receive the pass from the coach. On 1’s cut, X1 begins closing out to 1 on the catch.
If X1 has a long closeout, 1 should look to catch & attack (2 dribbles max). If X1 has a short or poor closeout, 1 should look to shoot on the catch.
Blast Cut Decision Making:


The offensive player (1) starts in the corner with the defender (X1) in the strong side dunker spot. The coach has a ball at the top of the key.
There are also two cones placed just inside the three point line. One free throw line extended and the other even with the 2nd hash on the lane.
The drill starts with 1’s blast cut or cut from the corner to the wing to receive the pass from the coach.
On 1’s cut, the defender X1 is closeout out to a cone (top or bottom cone).
If X1 closes out to the top cone, 1 should catch and rip to drive baseline. If X1 closes out to the bottom cone, 1 should stampede the catch or run through it to attack middle.
After closing out to a cone, X1 attempts to recover and contest 1’s finish.
Skip Pass 1 on 1:


The offensive player (1) starts in the opposite slot of the coach, who has a ball.
The defender (X1) is positioned in help (halfway between the ball and his man and a step off the line).
On the coach’s skil pass to 1, X1 closes out while 1 is looking to attack the closeout and finish at the rim (2 dribbles max).
PNR Hostage Dribble 1 on 1:


The defener (X1) starts on the opposite block of 1 (who is in the slot).
X1 sprints to set a screen (on-air) for 1 to attack middle. After using the screen, 1 slows down to work on their hostage dribble or dribble hold.
After screening for 1, X1 turns and becomes the defender who 1 attempts to keep on his back before exploding to the rim and finishing.
X1 tries to recover and contest 1’s finish.
Wing 1 on 1:


Coach starts with the ball at the top of the key while the offensive player (1) is being guarded by the defender (X1) on the wing.
X1 tries to deny the catch, forcing 1 to work to get open (get into X1’s body and create space for the catch).
On the catch, the drill is live and 1 can use 2 dribbles max to try and finish at the rim. No jumpshots.